Saturday 27 November 2010

Final Piece

Final Photo of dress


________________________________________________________________________________________


Photos to show the movement of the final garment:


Friday 26 November 2010

Innovation Practice

The final construction of the piece via Subtraction cutting using 2 materials; 1 light grey/beige lycra, and 1 a darker shade of grey in lightweight cotton.

-Cut the patterns out with 1cm seam allowance (done in the previous lesson prior to making).
-The front piece was altered from the standard bodice block to change the neck line. Instead of a normal rounded neck , we introduced a boat neckline.
-The Back was altered from the standard back block, and was made in to a low- cut piece, in conjunction with thinning the straps for it too.
To make sure the back holds its form we added darts from the underarm and closed them.
-4 Circles were cut out, using the measurements of our hips - they had to be wide enough for the tunnels to fit over the body in order for the whole dress to fit.

-Lining measured accordingly, to fit in with the bodices.


Pin the two sheets of fabric together - 2.6 m long to hold them steady as the lycra is difficult to work with and slips around. Place the bodice patterns on top and draw your chosen shape for the negative space.


-Cut out-


Place the circles on the fabric after sewing the casing (as listed in the below description of how to subtraction cut) and cut out only through the top layer of fabric.


Sew the circles together (as listed below) and then once the rings have been created work on the shoulders and turn inside out.


This is how garment looked on the mannequin once it had been sewn together.
Not the most flattering of shapes as the jersey just skims over the hips, widening the shape but it looks a lot better on an actual person as it hugs the figure, achieving the desired, body-con affect.


Final Design


My final design with the group collaboration is a fitted, light grey, lycra bodice with thin straps and a boat neckline and low-cut back; all constructed via subtraction cutting.
My theme was distortion from light which came about in many ways, as mentioned in my concept pages and 'Light' posts.

The folds and draping that occur once the process is complete mimic the linear forms and angles which forms the basis of how light travels and manipulates - in straight lines, unless and object which reflects it, bends it towards a different way - directional.

My initial designs also incorporated subtraction cutting as the aesthetics of the skirt piece resemble creases, wrinkles, cracks and sagging; all apparent in my theme of distortion through sun worship and too much exposure of the skin through tanning.

Any folds and creases in fabrics and any materials catch the light to form highlights and shadows. This is also something I have looked in to; the forms and the colours - darkness and illumination.

The final design brings all my ideas together as well as the idea of body movement and research for the human body.

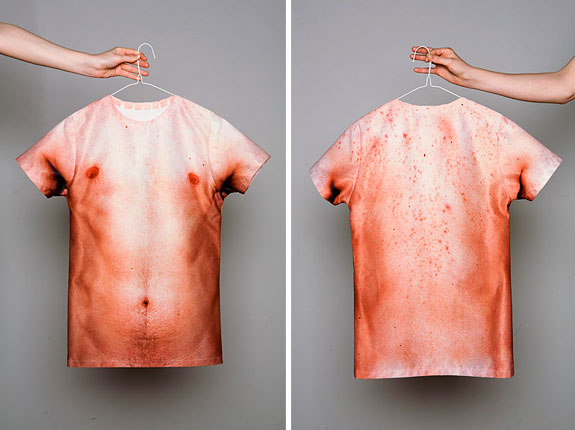
The torso image on the body was manipulated on Photoshop to distort it and make it slightly more shocking. It is placed on the bodice through Screen printing.

Design Development

I have refined and developed my initial designs to come up with these final 15 outcomes.

1.


2.


3.


4.


5.


6.


7.


8.


9.


10.


11.


12. 


13.


14.


15. 


Screen Printing

Screen printing is a printing technique that uses a woven mesh- confined in a frame -to to support an ink-blocking stencil.

This is something we will use in our group to print on a manipulated image of a torso.


Further Development

As I am collaborating with Sophie Saunders - slsaunders.blogspot.com

on the making process we had to combine our ideas in order to create a garment together which had little, or a lot of aspects to do with our individual research.
Together we decided that we liked the idea of movement through the human form. Sophie had the most relevant research towards this, but as we are looking at torso images I have some useful imagery and concept ideas as well through my light and shadow research on the human body ( shadows e.t.c.) to put forward for design ideas.

Here is some more relevant research towards the final garment:


  Kurt Hentschlager’s, 'Performance'

-This visual artist captures emotion through the movement of the human body.


Simon Berg


This Swedish photographer has printed on to the material to reveal the body shape. As we are focussing heavily on the appearance of the torso, this is a new idea for how to represent or show the human body, other than the body itself, transparent materials, or body conscious garments.


As movement ties in to light concepts such as, during the process of diffraction and shadow distortion then I don't need that many ideas changing.
By looking at Tan lines and Sun damage etc I've found inspiration in images of the human body anyway through the research in to Fashion Photographers.

Wednesday 24 November 2010

Initial Designs

Subtraction cutting and light draping.
Revealing or fitted top half to reflect research in to sun bathing; tan lines, skin etc.


Subtraction cutting and draping around the neck - Turtle necks and Cowl neck lines reflect my research in to skin damage; wrinkles, sagging and loose skin.

Subtraction cutting and draping around the neck - Turtle necks and Cowl neck lines reflect my research in to skin damage; wrinkles, sagging and loose skin.
Layers.
V-necks reflect research in to sun worship; swim suits (revealing, fitted) and tan lines.
Subtraction cutting. Draping. Folds. Layers. Fitted parts to garment and then loosely fitted to contrast - reflecting research.


These designs I think are the most successful and would be the best to develop further; looking in to more draping and subtraction cutting.


They have all been influenced by the subtraction cutting and draping in order to create movement in the garment, lines and angles and fluidity.
I have been drawn to fitted garments around the top half of the body and then loosely fitted towards to bottom of the body inspired by my research
.

Concepts


Innovative Cutting Technique

Dress with Draped Design


(Working on a half scale)
1) 1.  Trace around the pattern pieces; Bodice front and back, adding 0.5cm seam allowance.
2)  2. Cut across the of the waist point to create two separate piece of the front.
3)  3. Cut across the line running through the centre of the dart then reattach the pattern using the draped design technique.
4. Mark where you want the curve C - B to go.
5. Mark a straight line from B to the shoulder point. Create a curve of 0.5cm in from the line where it meets the circle which is point A.
6. Then mark out where 4cm of radius of a circle on the waist point.
7. Join the first shoulder mark with this 4cm circular line and bring it half way to the bottom.
8. and do the same for the centre dart and bring it down to half way.
9. Get rid of the shoulder Parts that are not needed on the right of the first line - neck piece.
10. Then close the chest dart which opens the shoulder dart out.
11. Add some paper at the bust point and draw a 4cm diameter of a circle.
12 Then cut along C as shown within the photographs.
13 Then cut along the first slashed open dart and close it.
14 Opening the pattern pieces out to a 8cm distance and at both the same measurements. 
15 Cut up all equal section and then sew together the to inner points to create the twist.


Although I enjoyed this technique and think the final product is very aesthetically pleasing, it is not something I think I will develop further within my conceptual ideas and design work.
Through looking in to light and movement my ideas are heading towards more structured garments which create lines and angles in it's form; changing the silhouette of the body. This 'Drape Design' is more about the aesthetics on the garment, rather than a change to the over all form.
Twists don't ever happen in 'light production/movement to do with light' - as I have seen through my research in to facts and definitions about light - only, straight lines, bends and angles; which is why Subtraction cutting is much more suited to where I am thinking of heading.